In late 2016, we released Beyond Software 5.0, which included the first version of our mobile time and expense-tracking app. We received lots of great feedback, and we addressed much of that feedback with Beyond Software 6.0 (click the link for an overview of the innovative features and enhancements).
Frequently Asked Questions
Why should I (or my team) use the mobile app instead of the desktop app?
We get this question a lot, which is why we’ve put together this article – to highlight which features overlap between the two, as well as key differences that should be noted. By the time you’re done reading, you should have a clear understanding of the differences, and a good idea of which application will best suit your needs.
Is there an additional cost to using the mobile app?
No.
How hard is it to setup the mobile app for users?
It’s easy. The only requirement for setting up users is they must have their company email address on file within the Beyond Software system as their username.
For example, if John Doe's username is currently 'jdoe' , the System Administrator would need to update John's username to be jdoe@contoso.com in order for him to be able to login to the mobile app (you can edit a person's username by navigating to Administration | Users).
Can I switch back to the desktop version if I want to?
Yes – setting up and using the mobile app does not prevent you from using the desktop app. If you want to enter time on your phone or tablet using the app and then pull up that same timesheet on your desktop, you can easily do so. The flexibility of the mobile app complements the desktop app to provide options that best fit your work habits.
Main differences between the mobile app and the desktop version for time and expense tracking:
There are three prominent differences between the mobile app and desktop in Beyond Software:
- Accessibility – first and foremost, the mobile app allows you to capture time and expenses anywhere, from any device, at any time (as long as you have internet connectivity). You can download it from the iOS/Android app stores on your phone or tablet, or you can type mobile.beyondsoftware.com into your browser on a PC. With the desktop version of Beyond, time and expenses can only be captured on a personal computer through the windows client interface.
- User interface – the second difference you will notice is that the mobile apps have a more modern design and layout for an improved user experience.
- Available apps – The Beyond Software mobile app includes Time and Expense, plus a few other productivity apps discussed in more detail below. The mobile app was built primarily for those employees who spend a lot of time in the field or away from the office, so they can easily and accurately capture their time and expenses on-the-go.
In the following sections, we note the similarities and differences between individual app features (time entry, expense entry, approvals).
Time Entry
What is the same?
Aside from the design of the mobile app, which we discussed earlier, most features are the same between desktop and mobile time entry:
- Desktop and mobile both have two views for entering time – a daily view (to enter time by the day) and a weekly view (to enter time for the whole week at once).
- You can easily navigate to previous weeks, the current week, or next week’s timesheet.
- Key fields, such as totals and status are displayed – all fields you are used to seeing when entering time will still be there on mobile, including date fields and total hours.
- You can submit timesheets for approval from within the mobile app just like desktop.

Weekly Timesheet (Desktop)

Weekly Time Entry/Landscape (Mobile)
What is different?
There are three main differences between mobile time entry and desktop:
- In mobile, the size of your device determines which time entry view will default. There are two views: Portrait and Landscape (Daily and Weekly views in desktop). If you access the mobile app on a phone, you will default to Portrait view as it is better suited for smaller screens. If you access the app on an iPad/tablet, or web browser on your computer, you will have the option to choose between Portrait and Landscape view.
- Mobile time entry (Portrait view) allows you to group a timesheet by Date, Project, or Customer, making it easy for you to change how you view your timesheet.
- In mobile time entry, you can copy a time entry (in Portrait mode) from the current week or any previous week – if you are in Landscape mode you can copy an entire week to save you time entering hours worked on common projects.
What is new?
One new feature available in mobile (but not desktop) is dashboards – you can create and customize widgets to compare how many hours you’ve spent on certain projects, view the number of hours you’ve entered this week, and much more. We’ll go into further detail on dashboards below.
Expense entry
What is the same?
If you currently enter expense reports on desktop, you can expect a similar experience on mobile.
- Easily add multiple expenses to a report, customize the dates, add comments/categories/quantity, and charge it to a specific project.
- In both mobile and desktop you can attach files to an expense report, such as a picture of a receipt (although in mobile you can take a picture directly from your phone’s camera and attach it automatically!).
What is different?
Most of the differences between desktop expense entry and mobile overlap with the differences in time entry.
- In mobile expense, you can sort expense entries by Date, Category, Project or Cost.
- In mobile expense entry, you can attach different files to specific expense report detail lines – in desktop you can attach as many items as you want to an expense report, but mobile allows you to associate a file with a detail line on the expense report.
- If accessing the mobile app from your phone, you can use your camera to take pictures and attach them to the expense report entry automatically.
Mobile time & expense approvals
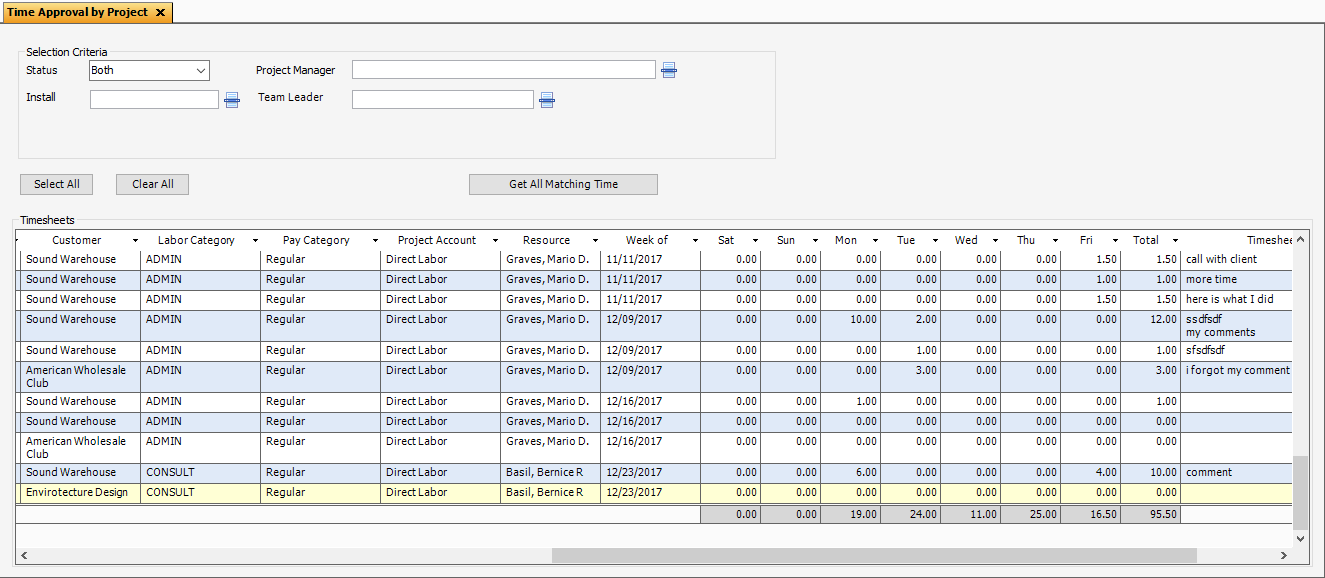
Time Approval Screen (Desktop)
What is the same?
The overall screen layout between desktop and mobile approvals (for both Time and Expense) is very similar; a table format with all the important columns and a total row at the bottom.
What is different?
The first difference is how timesheets and expense entries are displayed and grouped in the table. Desktop displays all the detail lines and allows you to sort them by various columns. The mobile approvals screen, however, lets you group detail lines by Resource, Date, Timesheet, Project, Customer, Project Manager or Expense Report, and then choose whether you want to display the detail lines under each group. This makes it easy to drill down into certain groupings without cluttering the screen.

Time Approvals Filter (Mobile)
The second difference is related to filtering detail lines from the approvals tables. In desktop, you are presented with a few different selection criteria – Status (pending/submitted/approved), Project, Project Manager and Team Leader. Mobile provides you with three standard filters (Include time for my projects, Include time for my team, and Exclude all Pending time), and an Advanced search filter. You can use the Advanced search filter to enter a Project ID, Resource Name, Expense Category or any other search criteria related to the entries.
Additional features in the Beyond Software mobile app
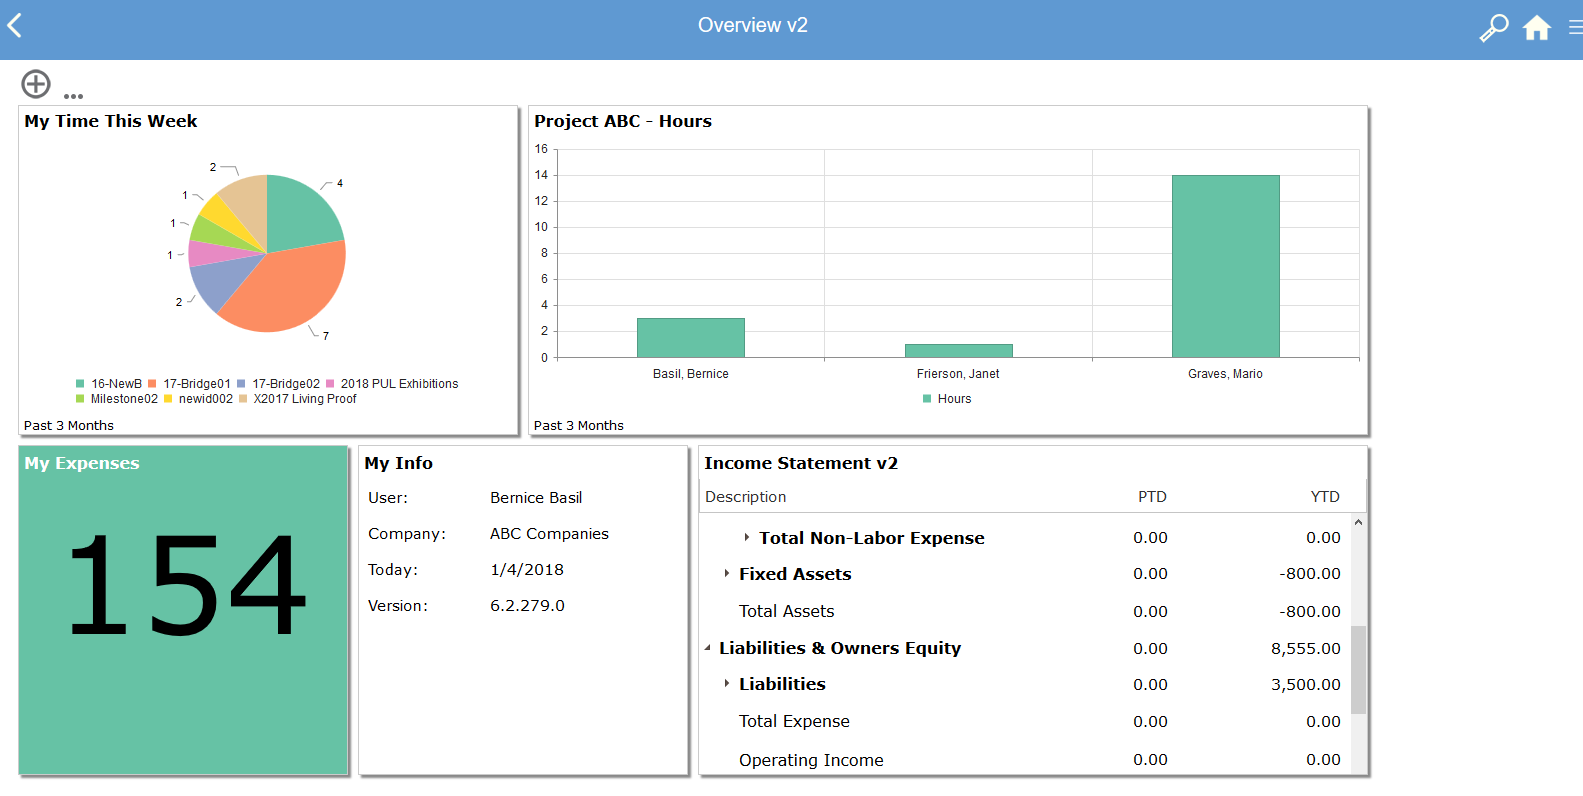
Dashboards
One of the features our users are most excited about is dashboards (available in the mobile app). Dashboards provide users with a quick overview of information that is most important to them.
You can create and add widgets to dashboards based off data from a number of different objects – Projects, Tasks, Project Expenses, and Project Time are the most common.
Sample Dashboard (Mobile)
Examples of some commonly used widgets:
- A pie chart that shows how much time you’ve spent on different projects this week
- A KPI widget showing the dollar amount of expenses you’ve entered this quarter
- A bar chart showing the number of hours different resources have entered against a particular project (for project managers and users who have rights to other resources)
These widgets are just a few examples. Aside from common date range filters, more advanced filters can be applied to individual widgets.
While dashboards have a lot of great features, we’re constantly making improvements and adding more objects and associated data to create additional widgets, so stay tuned for updates.
Contracts
Project Contracts is a new screen in Beyond Software mobile. Contracts can only be used in the mobile app, however you can access contracts from desktop (navigate to Projects | Contracts to open the app in a browser).
For more information on Contracts and how to set them up, check out this Quick Start Guide.
Search Console
The search feature in the Beyond Software mobile app is another new and useful tool. Any data object you can create a widget from, you can also perform a search on.
For example, if you wanted to search for all projects where Type = Billable and Customer ID = CUST1, you could do so. Or you could do a search on time you’ve entered for a specific project, or approved expense reports from last month.

Search Console (Desktop)
The best part about the search console is that once you apply all the filters you want, you can easily create a widget from that search and add it to a dashboard. By default, the widget will be in table format, but if you want to edit the widget to make it a bar chart or KPI, you can easily do so.
Actions/Meetings/RightPage
Within the mobile app are a series of productivity apps that can help you throughout the day.
- Actions – keep a mobile to-do list with you at all times. You can create Actions, add notes, associate them with a project/task, and assign them to different users. Actions are integrated with dashboards, widgets, the search console and Meetings
- Meetings – create meetings and agendas, keep track of attendees and decisions made during the meeting, and record to-do items that need to be completed before the next meeting.
- RightPage – a brainstorming tool that helps organizations become more aligned, focused and profitable.
How do I get started with setting up users for mobile?
All you need to do to start using Beyond Software mobile is make sure all your users have their company email address as their username in the Beyond Software system.
To do this, in desktop navigate to Administration | Users and select a user.

Navigate to Administration > Users (Desktop)
Next click ‘Edit User’ and verify that the User Name field contains an email address. If it doesn’t, simply update the field with the correct email address for that user, save, and that’s it! The user is now enabled for mobile access.
*You need to notify users if you change their User Name, as login credentials are the same for mobile and desktop. If they want to log into desktop, they will need to use their new User Name (email address) like they would for mobile.

Click 'Edit User' and verify they have an email address as their User Name (Desktop)
To access the mobile app, you can download it on your phone or tablet in the Android/iOS stores by searching for ‘Beyond Software Corporation’:
Additionally, from any web browser you can navigate to 'mobile.beyondsoftware.com' for access.
We encourage you to explore the benefits of using the mobile app today - it's no secret that mobile time entry can have a positive impact on profitability.
Have questions? Please reach out to support at support@beyondsoftware.com